

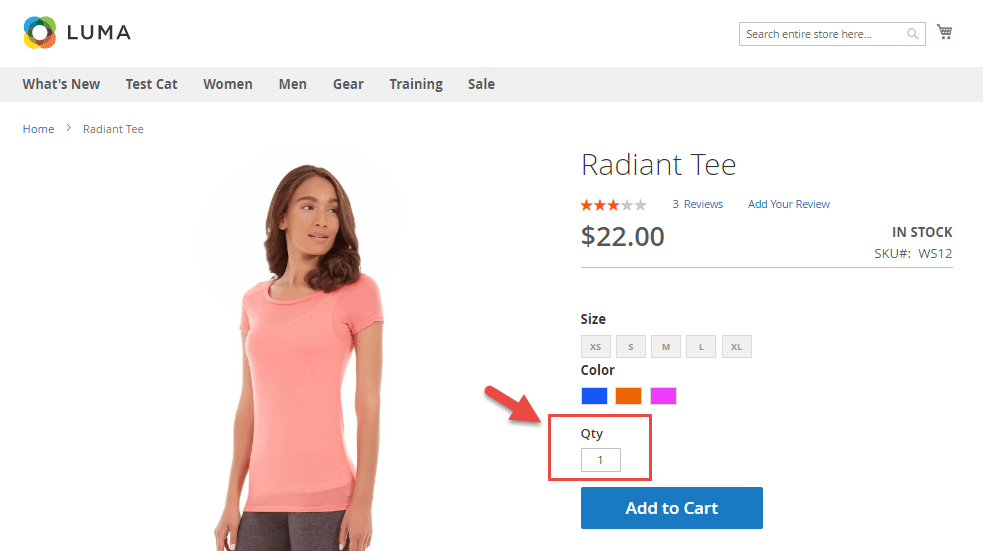
By default, in the product page of Magento 2, there are no quantity increment buttons (or decrement buttons). Therefore, in the today blog post, we will show you 7 simple steps to add these buttons on your website in order to improve your user experience as a result.
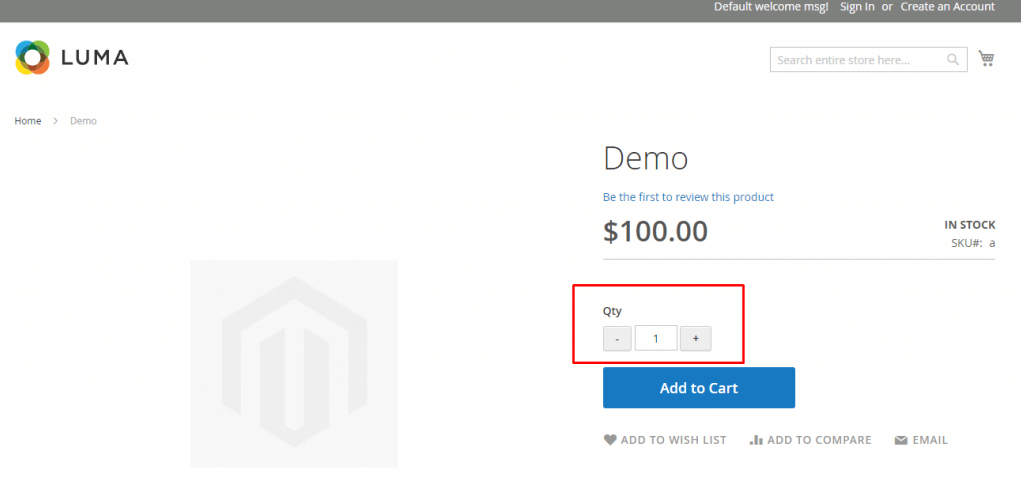
After we customize to display the quantity increment buttons in Magento 2 product page:
Step 1: Create a module.xml file in app/code/Tigren/AddQuantity/etc/
<?xml version="1.0"?>
<config xmlns:xsi="http://www.w3.org/2001/XMLSchema-instance" xsi:noNamespaceSchemaLocation="urn:magento:framework:Module/etc/module.xsd">
<module name="Tigren_AddQuantity" setup_version="1.0.0"></module>
</config>
Step 2: Create Registration file of Module
<?php
\Magento\Framework\Component\ComponentRegistrar::register(
   \Magento\Framework\Component\ComponentRegistrar::MODULE,
   'Tigren_AddQuantity',
   __DIR__
);
Step 3: Create file addtocart.phtml in app/code/Tigren/AddQuantity/view/frontend/templates/catalog/product/view/
Copy the file addtocart.phtml to vendor/magento/module-catalog/view/frontend/templates/product/view – Edit the file addtocart.phtml we’ve just copied: – Add the following code before quantity field. It would help you create a UI component and initialize it:
<script type="text/x-magento-init">
{
   "*": {
	   "Magento_Ui/js/core/app": {
	       "components": {
	           "change_qty": {
	               "component": "Tigren_AddQuantity/js/view/product/view/change_qty",
	               "defaultQty": <?php echo $block->getProductDefaultQty() * 1 ?>
	           }
	       }
	   }
   }
}
</script>
Step 4: Connect change_qty with its HTML
<div class="control" data-bind="scope: 'change_qty'">
   <button data-bind="click: decreaseQty">-</button>
   <input  data-bind="value: qty()"
   type="number"
   name="qty"
   id="qty"
   maxlength="10"
   title="<?php echo __('Qty') ?>"
   class="input-text qty"
   data-validate="<?php echo $block->escapeHtml(json_encode($block->getQuantityValidators())) ?>"
   />
   <button data-bind="click: increaseQty">+</button>
</div>
*data-bind=”scope: ‘change_qty’” to connect HTML with Javascript function. The two increment and decrement buttons have been added on the above code. The final addtocart.phtml file will look like the following:
<?php
/**
* Copyright © 2013-2017 Magento, Inc. All rights reserved.
* See COPYING.txt for license details.
*/
// @codingStandardsIgnoreFile
/** @var $block \Magento\Catalog\Block\Product\View */
?>

<?php $_product = $block->getProduct(); ?>
<?php $buttonTitle = __('Add to Cart'); ?>
<?php if ($_product->isSaleable()): ?>
<div class="box-tocart">
   <div class="fieldset">
       <?php if ($block->shouldRenderQuantity()): ?>
       <div class="field qty">
	   <label class="label" for="qty"><span><?php /* @escapeNotVerified */ echo __('Qty') ?></span></label>

<script type="text/x-magento-init">
{
   "*": {
	   "Magento_Ui/js/core/app": {
	       "components": {
	           "change_qty": {
	               "component": "Tigren_AddQuantity/js/view/product/view/change_qty",
	               "defaultQty": <?php echo $block->getProductDefaultQty() * 1 ?>
	           }
	       }
	   }
   }
}
</script>

<div class="control" data-bind="scope: 'change_qty'">
   <button data-bind="click: decreaseQty">-</button>
   <input  data-bind="value: qty()"
   type="number"
   name="qty"
   id="qty"
   maxlength="10"
   title="<?php echo __('Qty') ?>"
   class="input-text qty"
   data-validate="<?php echo $block->escapeHtml(json_encode($block->getQuantityValidators())) ?>"
   />

   <button data-bind="click: increaseQty">+</button>
</div>
       </div>
       <?php endif; ?>
       <div class="actions">
	   <button type="submit"
	           title="<?php /* @escapeNotVerified */ echo $buttonTitle ?>"
	           class="action primary tocart"
	           id="product-addtocart-button">
	       <span><?php /* @escapeNotVerified */ echo $buttonTitle ?></span>
	   </button>
	   <?php echo $block->getChildHtml('', true) ?>
       </div>
   </div>
</div>
<?php endif; ?>
<script type="text/x-magento-init">
   {
       "#product_addtocart_form": {
	   "Magento_Catalog/product/view/validation": {
	       "radioCheckboxClosest": ".nested"
	   }
       }
   }
</script>
<?php if (!$block->isRedirectToCartEnabled()) : ?>
<script type="text/x-magento-init">
   {
       "#product_addtocart_form": {
	   "catalogAddToCart": {
	       "bindSubmit": false
	   }
       }
   }
</script>
<?php endif; ?>
Step 5: Create file change_qty.js in qpp/code/Tigren/AddQuantity/view/frontend/web/js/view/product/view
define([
   'ko',
   'uiComponent'
], function (ko, Component) {
   'use strict';
   return Component.extend({
       initialize: function () {
	   //initialize parent Component
	   this._super();
	   this.qty = ko.observable(this.defaultQty);
       },
       decreaseQty: function() {
	   var newQty = this.qty() - 1;
	   if (newQty < 1)
	   {
	       newQty = 1;
	   }
	   this.qty(newQty);
       },
       increaseQty: function() {
	   var newQty = this.qty() + 1;
	   this.qty(newQty);
       }
   });
});
Step 6: Create file catalog_product_view.xml in app/code/Magenticians/Mymodule/view/frontend/layout
<?xml version="1.0"?>
<page layout="1column" xmlns:xsi="http://www.w3.org/2001/XMLSchema-instance" xsi:noNamespaceSchemaLocation="urn:magento:framework:View/Layout/etc/page_configuration.xsd">
   <body>
       <referenceBlock name="product.info.addtocart">
	   <action method="setTemplate">
	       <argument name="template" xsi:type="string">Tigren_AddQuantity::catalog/product/view/addtocart.phtml</argument>
	   </action>
       </referenceBlock>
       <referenceBlock name="product.info.addtocart.additional">
	   <action method="setTemplate">
	       <argument name="template" xsi:type="string">Tigren_AddQuantity::catalog/product/view/addtocart.phtml</argument>
	   </action>
       </referenceBlock>
   </body>
</page>
Step 7: Run the following commands
php bin/magento setup:upgrade

php bin/magento setup:di:compile

php bin/magento indexer:reindex

php bin/magento cache:clean

php bin/magento cache:flush
We have given you a detailed instruction to add the quantity increment buttons to your Magento 2 storefront. If you have any problems following the guide, please leave a comment below.
Read More:
How To Add Custom Validate Field In Magento 2 Form?
How To Display Order Information In Checkout Success Page In Magento 2?